
Dieser Beitrag ist auch verfügbar auf:
![]() Deutsch
Deutsch
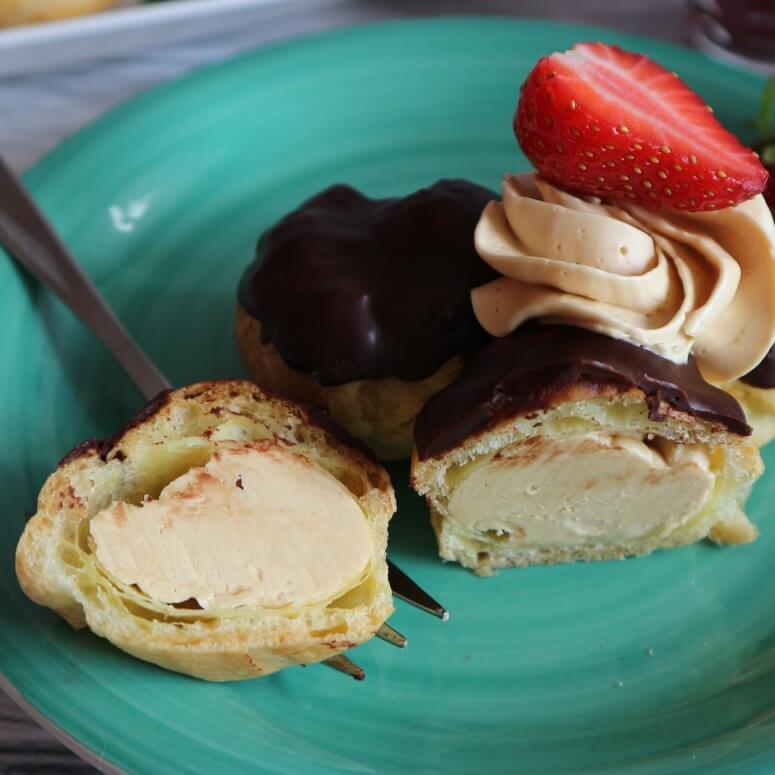
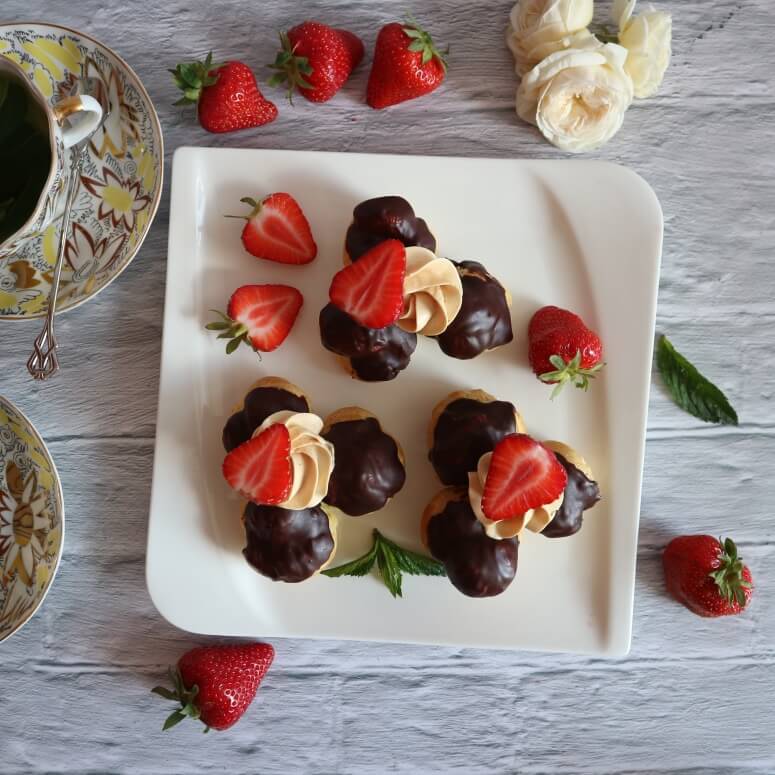
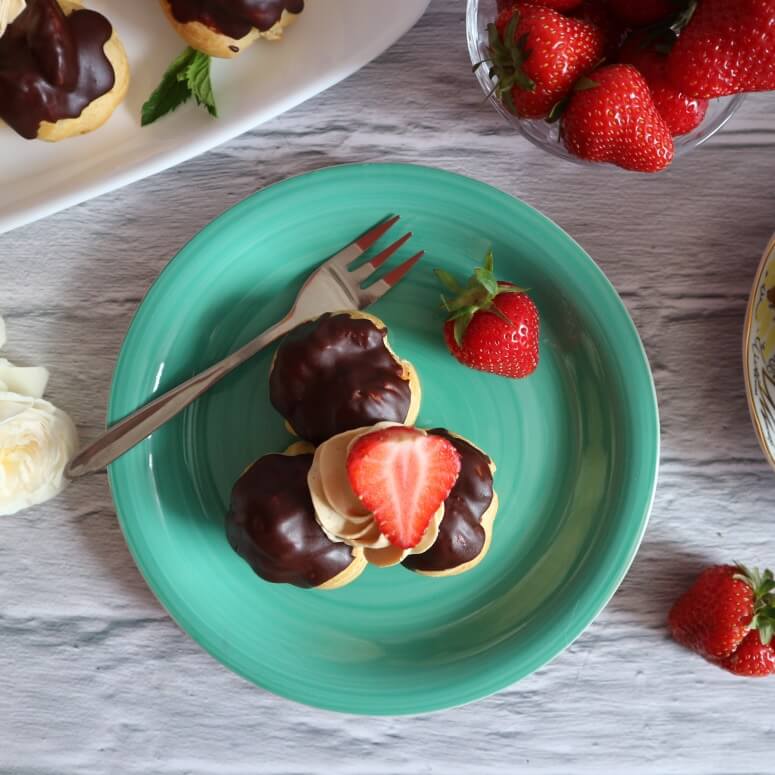
The mini cake “Konstantinovskoe” combines in itself so many different flavors. It is the fluffy choux pastry, the delicate butter cream, the chocolatey glaze and the fresh fruits. The dessert dates back to the Soviet era and has since been forgotten. However, you can make it yourself at home. You can find a detailed recipe for the mini cake “Konstantinovskoe” with exact quantities and step-by-step instructions here at the very bottom.

Delicious combination of choux pastry, butter cream, chocolate glaze and fruit
The mini cake “Konstantinovskoe” is made of a fluffy choux pastry that tastes light and airy. It is filled with a simple butter cream, which has a slight caramel note and perfectly combines with the choux pastry with its creamy and delicate taste. The glaze gives the mini cake a chocolaty note. The taste is rounded off with the fresh strawberries, which give the pastry an additional fruity taste.

Alternative for the butter cream
The mini cake “Konstantinovskoe” was available in the Soviet Union with either a butter cream or pudding cream filling. I filled it with a simple butter cream consisting of caramelized sweetened condensed milk, butter and vanilla. Depending on your taste, you can also make your mini cakes with vanilla pudding cream. You can find the recipe for this cream, for example, in the post for my Napoleon cake. By the way, you can make the mini cake “Konstantinovskoe” even more unique if you fill it with two or more different creams – a different filling in each choux pastry ball.
Alternative for the chocolate glaze
According to the original recipe, the mini cake “Konstantinovskoe” was covered with the chocolate fondant. However, since its preparation is a bit laborious, I made the pastry with an ordinary chocolate glaze. If you do want to make the chocolate fondant yourself, you can use my recipe for the mini cake “Bouchee”. Sometimes each choux pastry ball in the mini cake was covered with the glaze in a different color. You can also do this by cooking the white fondant and then coloring it with different food colors. Or you can prepare a simple icing using powdered sugar and lemon juice and color it. Alternatively, you can frost the mini cakes with the white icing instead of the chocolate glaze.
Dessert from the Soviet era with a nostalgic name
The mini cake “Konstantinovskoe” belonged to the pastry of the Soviet era and was sold in some pastry shops at that time. Now it has fallen into oblivion, hardly anyone remembers the choux pastry dessert. However, according to the recipe, you can make the mini cake yourself at home. By the way, the word “Konstantinovskoe” comes from Konstantinovsk – the town in Russia, located in Rostov oblast.
This mini cake “Konstantinovskoe” is
- delicate,
- creamy,
- fluffy,
- chocolatey,
- fruity,
- very tasty,
- with butter cream,
- also possible with vanilla pudding cream,
- simple, but with some effort to make yourself,
- an eye-catcher on the dining table,
- perfect for a party,
- forgotten Soviet dessert.
Recipe for mini cake “Konstantinovskoe”
The mini cake “Konstantinovskoe” is not difficult to make, but it requires some steps. Here you can form a rough idea of how the preparation is done, and what you need for the recipe. The exact quantities and step-by-step instructions on how to make the Soviet mini cake “Konstantinovskoe” yourself can be found here below in the box recipe.
For the choux pastry you need
- room-warm butter,
- eggs,
- water,
- flour
- and a little salt.
For the cream you only need
- room-warm caramelized sweetened condensed milk,
- room-warm butter
- and vanilla.
For the chocolate glaze you add
- any chocolate
- and some butter.
For the decorating are still needed
- fresh strawberries or other fruits.
How to make mini cake “Konstantinovskoe”: here’s how (Check out the detailed recipe below.)
- For the choux pastry, briefly boil butter, water and salt. Stir in the flour quickly and burn the dough until it comes off the bottom of the pan as a lump and leaves a white layer of starch. Then let the dough cool and stir in eggs, one at a time, until the dough is shiny and sticks to a wooden spoon in peaks. Fill the choux pastry into a piping bag, pipe three small rosettes next to each other in the shape of a triangle onto a baking tray lined with baking paper and bake the triangular pastries at 200 °C for approx. 20 – 25 minutes until golden brown. Then let them cool down.
- For the cream, whip the caramelized sweetened condensed milk, butter and vanilla until fluffy and then fill the triangle pastry not too full with it, leaving some of the cream for decoration.
- Now melt chocolate together with butter for the glaze and coat the mini cakes with it. Then, using the remaining butter cream, pipe rosettes in the center of each mini cake and place fruit on top. Done!
How to make mini cake “Konstantinovskoe”: tips and tricks
- Instead of strawberries, you can use other fruits, for example, raspberries, cherries, blueberries.
- Caramelized sweetened condensed milk and butter must be room-warm, and both have about the same temperature, so that they can combine well when whipped into a cream.
- Instead of the butter cream, you can fill the mini cake “Konstantinovskoe” with the vanilla pudding cream as for the Napoleon cake.
- For the chocolate glaze you can use milk, white or dark chocolate.
- Instead of the chocolate glaze you can cover the Soviet choux pastry dessert with a sugar icing made of powdered sugar and a little lemon juice or with the chocolate fondant as in the original recipe according to the recipe for the mini cake “Bouchee”.
This is how you make the choux pastry:
- Boil water with butter just briefly. The butter must have already melted before boiling. Therefore, use room-warm butter and cut it into pieces before adding it to the water.
- Immediately add flour to the water-butter mixture as soon as you take it off the stove and stir it briskly and thoroughly.
- It is essential to burn the dough dumpling, that is, to heat it in the saucepan, stirring and turning it constantly, until it comes off the bottom of the saucepan as a dumpling, leaving a white layer of starch there. After all, this is choux pastry.
- Add eggs to the cooled (to about lukewarm) choux paste first, or you might get cooked eggs in the dough.
- For choux pastry, the right consistency is the most important thing of all. For this, the amount of eggs in the recipe is always approximate. You might not need the last egg completely, or you might need a small amount of one more egg. So, to get the right consistency from the choux pastry, proceed as follows: Don’t add the last egg directly into the dough, but whisk it in a small bowl and add it to the dough in batches, stirring the dough each time until it has a homogeneous consistency. Once your choux pastry shines and hangs in peaks on a wooden cooking spoon, it’s ready.
- Note that the choux pastry will increase in size as it bakes, so you should leave enough space between the pastries.
- Do not take the choux pastry out of the oven too early or it may collapse. It is ready when it has turned a golden brown color. Do not open the oven door during baking.
Did you make the mini cake “Konstantinovskoe” yourself according to this recipe? I’m looking forward to your result, your star rating and your comment here below, how you succeeded and tasted the choux pastry dessert.
Got an appetite for more choux pastry? Try it:
- How to make eclairs – recipe for world-famous French choux pastry
- Cream puff recipe: how to make profiterole filled with cream
- Choux pastry rings with curd – Russian curd rings with French background
- Cake “Damskie palchiki” – recipe for popular Russian choux cake
- Cream puff cake with cherries or raspberries – recipe

Mini cake "Konstantinovskoe"
Equipment
- Piping bag with hole and star nozzle
Ingredients
for the dough
- 250 ml water
- 100 g butter room-warm
- approx. 4 eggs
- 150 g flour
- 1/2 tsp salt
for the cream
- 300 g caramelized sweetened condensed milk room-warm
- 300 g butter room-warm
- vanilla
for the chocolate glaze
- 120 g chocolate
- 60 g butter
for the decorating
- approx. 10 strawberries fresh
Instructions
Preparation of the dough
- Put butter cut into pieces, water and salt in a saucepan and boil it very briefly, stirring constantly. (The butter must be melted before boiling).
- Take the saucepan off the heat, immediately add flour and mix briskly with a wooden wooden spoon until a large dough ball has formed.
- Put the saucepan back on the stove and heat the dough, stirring and turning it with a wooden spoon, for 1 - 2 minutes, until the dough comes off the bottom of the saucepan as a dumpling, leaving a white layer of starch there.
- Transfer the dough to a clean mixing bowl and let it cool to lukewarm.
- Using a hand mixer, food processor, or wooden wooden spoon, gradually stir in the dough one egg at a time until it is shiny and clings to a wooden spoon in peaks. It's best to whisk the last egg in a small bowl and add just enough of it to the dough until it's the right consistency.
- Fill the dough into a piping bag with an approx. Ø 8 mm nozzle and pipe three approx. Ø 2 - 2.5 cm dough dots next to each other in the shape of a triangle onto a baking tray lined with baking paper, leaving plenty of space between the triangles.
- Bake the choux pastry triangles in a preheated oven at 200 °C top and bottom heat for approx. 20 - 25 minutes until golden brown and let them cool down.
Preparation of the cream
- Whip the caramelized sweetened condensed milk, butter and vanilla for about 5 minutes to a fluffy cream.
- Transfer about 1/3 of the butter cream into a clean mixing bowl and set aside for now.
- Carefully fill all three choux pastry balls just a little, not too full, with the remaining 2/3 of the butter cream in each pastry, by pouring the cream into a piping bag fitted with a thin, long piping nozzle, then inserting the nozzle into the side of each choux pastry ball without tearing each of the three balls apart, and piping the cream into the cavity.
Preparation of the chocolate glaze
- Slowly melt chocolate together with butter.
- Brush the top of all three balls in each mini cake with the chocolate glaze and let dry.
Decorate the mini cakes
- Pour the butter cream you set aside into a piping bag fitted with a star nozzle and pipe a small rosette in the center of each mini cake.
- Cut strawberries in half and place a strawberry half on top of the butter cream rosette on each mini cake.
Notes
- Other fruits will work instead of strawberries, for example, raspberries, cherries, blueberries.
- Caramelized sweetened condensed milk and butter must be room-warm, and both about the same temperature, so they can combine well when whipped into the cream.
- For the chocolate glaze you can use milk, white or dark chocolate.
- For the choux pastry, the right consistency is the most important thing of all. For this, the amount of eggs in the recipe is always given only approximately. You might not need the last egg completely or you might need a small amount of one more egg. So, to achieve the right consistency of the choux pastry, it is best not to add the last egg directly into the dough, but to whisk it in a small bowl and add it to the dough in portions, stirring the dough each time until it has a homogeneous consistency.
- Do not take the choux pastry out of the oven too soon or it may collapse. Under no circumstances should the oven door be opened during baking.
- The time to cool the choux pastry and dry the chocolate glaze is not included in the preparation time.
- Note the detailed tips and tricks for making the mini cake "Konstantinovskoe" above in the post.