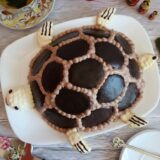
"Cherepacha" (Russian turtle cake)
"Cherepacha" is probably one of the most delicate Russian cakes. It is also known as a dessert and practically melts in your mouth after each bite. With this recipe, you'll make the turtle cake yourself. It tastes heavenly fluffy, creamy and moist.
Servings 12
Ingredients
for the dough
- 4 eggs
- 100 g sugar
- 170 g flour
- 5 g baking powder
- vanilla (e.g. vanilla sugar, vanilla bean scraped out, vanilla extract)
for the cream
- 550 g sour cream cold
- 100 g butter room-warm
- 150 g powdered sugar
- 20 g cocoa powder
for the chocolate glaze
- 35 g sour cream
- 20 g butter
- 20 g sugar
- 10 g cocoa powder
Instructions
Preparation of the batter
- Beat eggs, sugar, and vanilla until light and fluffy.
- Mix flour with baking powder and fold into the egg-sugar mixture to make a fluffy, gooey sponge batter.
- Using a tablespoon, place blobs (1/2 tablespoon per blob) on a baking sheet lined with baking paper, spacing them well apart, and bake the cookies in a preheated oven at 180 °C top and bottom heat for about 10 minutes. Repeat the process until the batter is used up.
Preparation of the cream
- Beat the butter and powdered sugar for about 5 minutes until you have a fluffy, creamy, light-colored mixture.
- Add sour cream and whip to a homogeneous cream.
- Alternative for decorating: Transfer two tablespoons of cream to a clean bowl and chill for now.
- Add cocoa powder to the rest of the cream and whip to a homogeneous chocolate cream.
Preparation of the cake
- Set aside about 20 sponge cookies. Dip the remaining cookies generously in the chocolate sour cream and layer them on top of each other on a flat plate in the shape of a turtle shell.
- Spread the "turtle shell" generously with the remaining chocolate sour cream, leaving about two tablespoons for decorating.
- Now take the sponge cookies that have been set aside. Cut two of them in half and make little feet on the "turtle shell". Make the head of the turtle from two more cookies by placing them on top of each other, and the tail from one cookie. Spread the remaining cookies on the surface of the "turtle shell", pressing them lightly. Refrigerate the cake for the time being.
Preparation of the chocolate glaze
- Place sour cream, butter, sugar and cocoa powder in a small saucepan and heat (don't boil!) it over low-medium heat, stirring, until the butter and sugar have melted and a smooth, glossy chocolate glaze has formed.
- Take the chocolate glaze off the heat and let it cool slightly.
Decorate the cake (as I did in the pictures)
- Brush the cookies without cream on the surface of the "turtle shell" with the chocolate glaze.
- Fill the chocolate sour cream left for decorating into a piping bag and use it to fill the slits between the cookies covered with the chocolate glaze.
- Pour the chilled light sour cream into a piping bag and pipe it over the turtle's head, feet and tail.
- Use the chocolate glaze to draw the turtle's eyes, mouth and claws.
- Chill the cake for at least five hours or preferably overnight.
Alternative: Preparation of the cake (quick version)
- Dip all the sponge cookies in the chocolate sour cream and layer them on top of each other in the shape of a turtle shell.
- Spread the "turtle shell" generously with the remaining chocolate sour cream.
- Prepare a triple portion of the chocolate glaze as described above and let it cool slightly.
- Pour the chocolate glaze over the cake and refrigerate.
Notes
- To check if the sponge cookies are done baking, gently press the surface of one of the cookies with a finger. If it springs back after pressing and no marks remain, they are done.
- You can adjust the amount of powdered sugar for the cream according to your taste.
- You can prepare a larger portion of chocolate glaze and use it to completely cover the cake.
- Note the detailed tips and tricks for making the cake "Cherepacha" above in the post.