
Dieser Beitrag ist auch verfügbar auf:
![]() Deutsch
Deutsch
This knit hat cake tastes incredibly creamy, airy and moist. With its unique look, it is a winter eye-catcher on the dining table and is ideal for the Advent days. Here I show you how to make such a fancy cake yourself without any special confectioner skills. A detailed winter hat cake recipe with exact quantities and step-by-step instructions can be found here at the bottom.
Moist sponge cake and airy cream
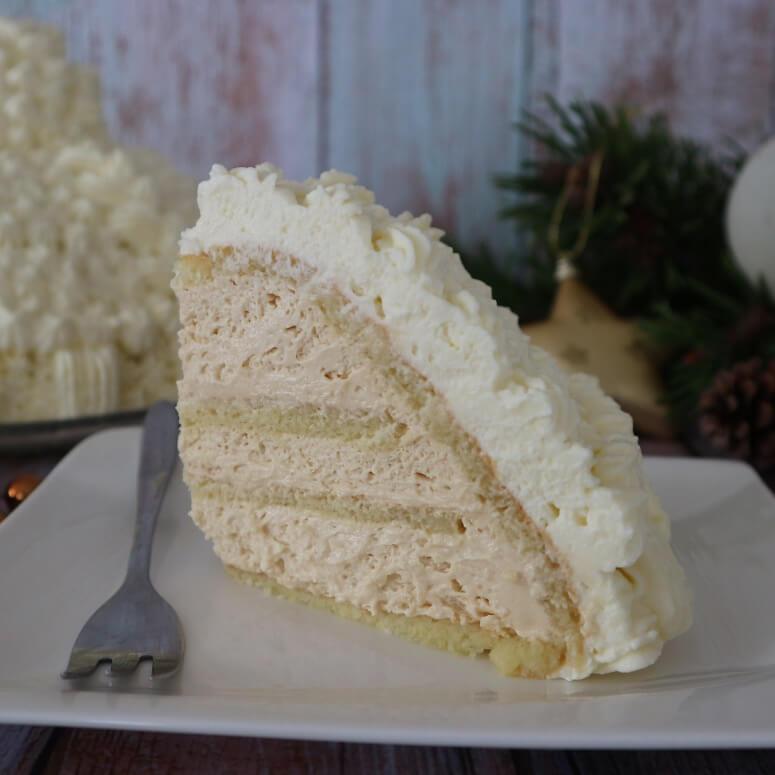
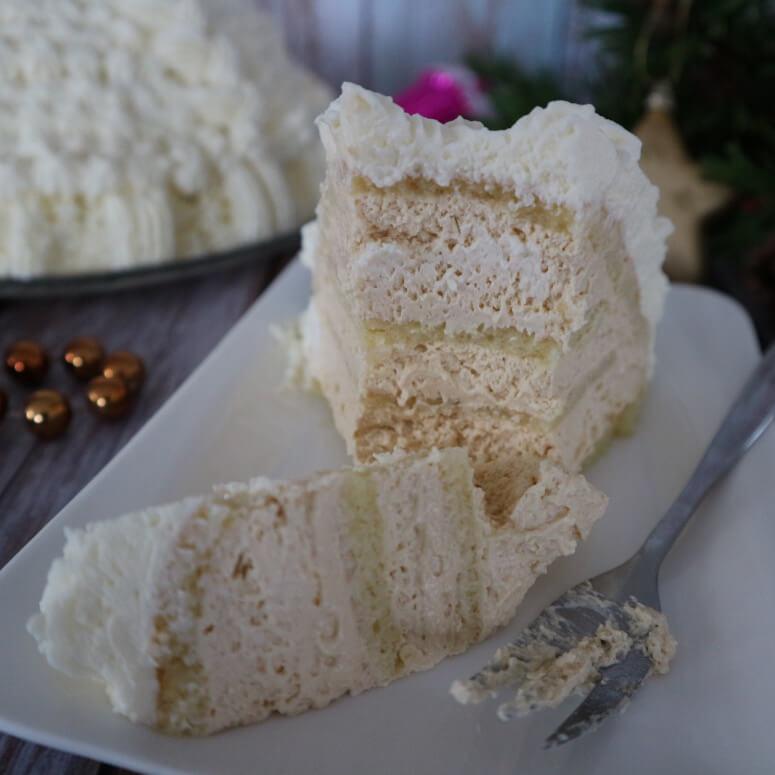
This winter hat cake consists of a very airy and creamy filling with a light caramel flavor. The sponge cake is heavenly fluffy. It is quite soaked by the cake cream, so it tastes incredibly moist at the same time. Thus, the sponge cake does not need to be soaked at all.
Winter knit hat cake – perfect for Christmas
The knit hat cake is an ideal Christmas cake. With its appearance, it is guaranteed to enchant your loved ones like in a fairy tale. But also in terms of taste, the cake is simply impossible to resist.
Alternative for shaping the cake
I shaped the dome cake with the help of a round bowl. This variation is pretty easy and quick, in my opinion. The quantities in the recipe here below are enough for a round salad bowl, which has a volume of 1.6 liters and is 20 cm in diameter at the top.
Bake sponge cakes in a springform pan
Alternatively, you can bake two round high sponge cakes, each for example 18 cm in diameter, in a springform pan. In this case, you may have to adjust the quantities for the sponge cake.
Stack the two sponge cakes on top of each other. From the top, insert a wooden skewer in the middle of the two sponge cakes so that they do not slip away. Now carve the upper sponge cake into a dome with a sharp knife. The lower cookie remains as it is.
Then separate the two sponges again and cut each of them lengthwise into about three thinner cake layers. Spread the cream on the sponge cake layers and stack them on top of each other in a dome shape. After the dome cake has been thoroughly cooled, it can be decorated.

More ideas for decorating cream
To decorate the winter hat cake, you definitely need a solid cream. I prepared a mascarpone cream cheese cream for this purpose. It has a creamy, airy and at the same time firm consistency. In addition, it is ready in a flash. But you have to work quickly with this cream, because it melts from the heat.
Butter cream with two ingredients
You can also decorate the knit hat cake with a simple butter cream. For this, take room warm butter and sweetened condensed milk in a ratio of about 1:1. Whip the two ingredients together to a cream.
Meringue cream
To decorate the winter hat cake, you can also use the meringue cream, which is popular in Russia. They often use it to decorate different cakes. The meringue cream is very light compared to butter cream, but it is quite sweet. You can find the recipe for this cream, for example, in my post for korzinochki or puff pastry horns.
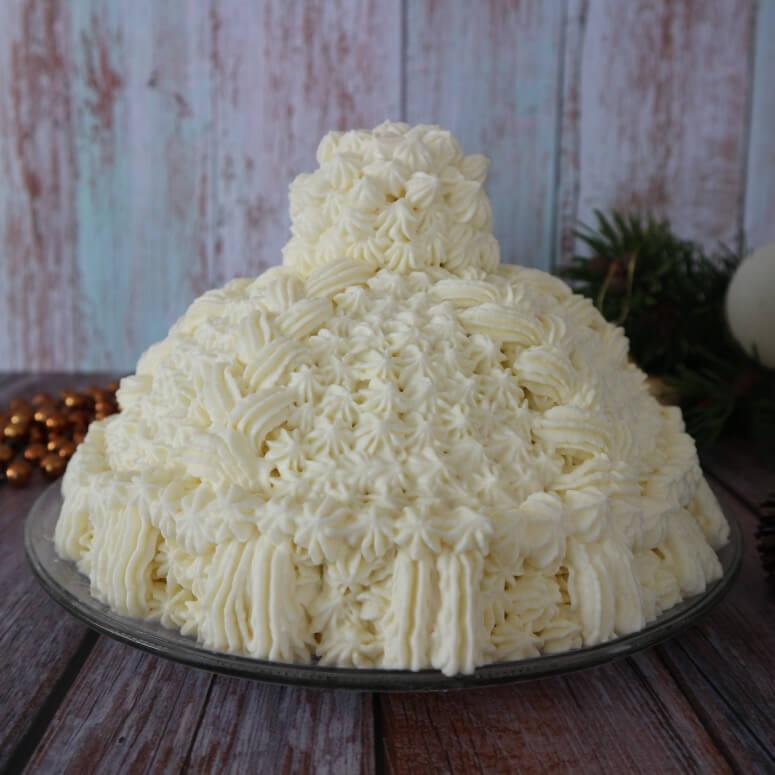
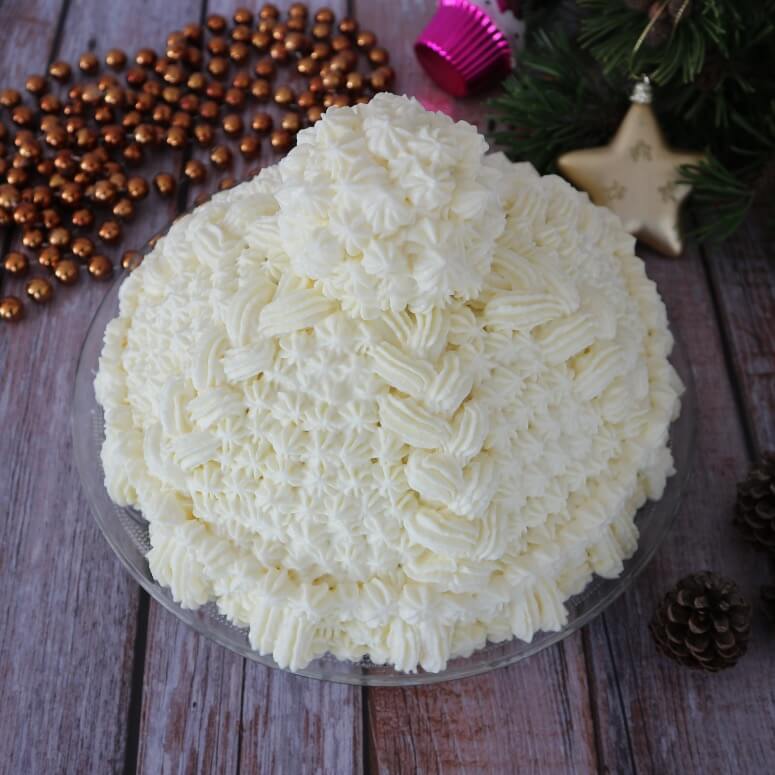
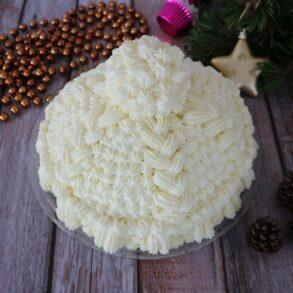
How to decorate the cake like a knit hat?
When decorating my knit hat cake, I opted for a very simple version. For this, I only used a single piping nozzle. That was a Ø 8 mm open star nozzle. Even those who are not professional pastry chefs will be able to make such a decoration.
Injecting knit braids
First, I visually divided the dome cake into 6 large pieces and drew 6 lines from top to bottom with a wooden skewer. Now I piped a braid pattern along those lines, leaving about 3 inches of space at the bottom of each.
Stars between the braids
I filled the space between the knit braids with little stars. You do this with the same star nozzle.
Draw cuff
Now we come to the cuff. For this, you again spray stars around the dome from the bottom to the knit braids. The cuff is then about 3 cm thick. Now spray two stripes next to each other from the bottom to the top, leaving a space of about 2 cm between each stripe. Around the cuff at the top I drew another row of stars.
Finish the pom pom
Now there is only the pom pom left. We will also spray it completely with stars.
Use alternative nozzles
Of course, you can use different piping nozzles to decorate the knit hat cake. For the pom pom, for example, a grass nozzle is very suitable. You can fill the space between the knit braids with threads. Use a very fine nozzle and pipe the cream from one braid to the other, moving the nozzle from left to right and vice versa.
This knit hat cake is
- very creamy,
- moist,
- airy,
- lightly caramelized,
- soft,
- fluffy,
- delicious,
- fancy,
- easy to make yourself,
- a winter eye-catcher on the dining table,
- perfect for Christmas.
Winter hat cake recipe
This winter hat cake recipe is very simple, even though the cake may seem elaborate at first sight. You’ll need to bake two large, thin cake layers from a regular sponge cake batter. For the cake cream, you just whip all the ingredients and don’t have to cook anything. It will only take you about 10 minutes.
However, the cake must be cooled thoroughly. It is best to put it in the refrigerator overnight.
The decoration cream is ready in about 5 minutes. For this, too, you only need to whip all the ingredients until creamy. Depending on how elaborate you decorate the cake, it takes more or less time.
How to make winter hat cake: tips and tricks
- Don’t bake the sponge cakes longer than necessary or it may become brittle and not bend. Check with a toothpick to make sure it’s done baking.
- To fill the winter hat cake, you can also make another cream. It should not be liquid, but have a firm consistency.
- Instead of the mascarpone cream cheese, you can make a butter cream or the meringue cream to decorate the cake. See my notes on this above.
- You can adjust the amount of powdered sugar for the decorating cream to taste.
- For detailed instructions on how I decorated my cake, see the post here above.
Did you make the knit hat cake yourself using this recipe? I’m looking forward to your results, your star rating and your comment here below on how you liked and succeeded with this fancy winter cake.
Looking for more fancy cake recipes? Try:
- Cake “Muraveynik” – recipe for Russian anthill cake
- “Cherepacha” – recipe for Russian turtle cake
- How to make tree stump cake – easy recipe for chocolate tree trunk cake
Winter hat cake / knit hat cake
Equipment
- round salad bowl – top Ø 20 cm large, volume approx. 1.6 l
- star nozzle open Ø 8 mm
Ingredients
for the sponge cake
- 6 eggs
- 135 g sugar
- 140 g flour
- 8 g vanilla sugar
- 1 pinch of salt
for the cake cream
- 400 g cream cheese cold
- 300 g cream cold
- 200 g caramelized sweetened condensed milk cold
- 8 g vanilla sugar
for the cream for decorating
- 400 g cream cheese
- 265 g mascarpone
- 160 g cream
- 150 g powdered sugar
Instructions
Preparation of the sponge cake
- Beat eggs, sugar, vanilla sugar and salt until light and fluffy.
- Fold in the flour to make an airy, thick sponge mixture.
- Spread half of the batter evenly on a baking sheet lined with baking paper and bake the sponge cake in a preheated oven at 190 °C top and bottom heat for about 10 minutes.
- Meanwhile, spread the remaining batter on a second baking sheet lined with baking paper and bake the second sponge cake directly after the first one, also at 190 °C top and bottom heat, for about 10 minutes. Let the two sponge cakes cool down.
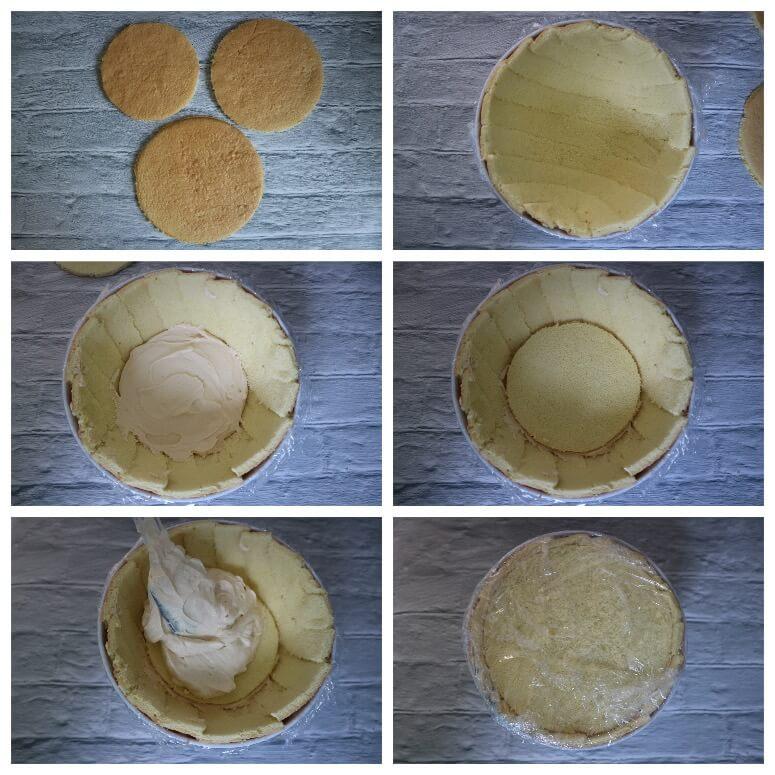
- Line the salad bowl with plastic wrap so that the wrap hangs outward.
- Cut sparingly, at the edge of the sponge cake layers three circles in the size of approx. Ø 18 cm, Ø 16 cm and Ø 14 cm each.
- Cut the leftover sponge cake layers into long strips about 3 cm wide.
- Spread the sponge cake strips close together in the salad bowl so that the bowl is completely covered with them (see pictures at the top of the post), and then cut off the ends of the sponge cake strips that are above the edge of the bowl.
- Gather the sponge cake scraps, wrap them in an airtight container, and set them aside for now.
Preparation of the cake cream
- Whip cream with vanilla sugar until creamy.
- Add cream cheese and whip until homogeneous.
- Add caramelized sweetened condensed milk and whip again to a homogeneous cream.
Preparation of the cake
- Pour about 1/3 of the cake cream (enough cream to fit the smallest round sponge cake base when placed on top of the cream) into the salad bowl with the sponge cake strips and place the Ø 14 cm sponge cake base on top (see pictures at the top of the post).
- Spread about half of the remaining cream on the smallest sponge cake base in the bowl and place the second largest (Ø 16 cm) sponge cake base on top.
- Spread the remaining cream on the second sponge cake base in the salad bowl and place the last largest (Ø 18 cm) sponge cake base on top.
- Cover the top of the bowl with the plastic wrap and refrigerate the cake for about 8 hours or overnight.
Preparation of the cream for decorating
- Whip cream cheese, mascarpone, cream and powdered sugar to a firm cream.
Decorating the cake
- Put about 1 tablespoon of cream in a small bowl, gradually add as much sponge cake scraps until you get a well moldable mass (like for cake pops).
- Form a ball out of the sponge mixture.
- Take the cake out of the fridge in the salad bowl, remove the cling film from the top, place a flat plate on top of the bowl and invert the cake onto the plate. Carefully remove the salad bowl and plastic wrap from the cake.
- Spread a thin layer of the decorating cream on top of the dome cake, place the sponge cake ball on top center of the dome and spread it with the cream as well.
- Fill the remaining decoration cream into the piping bag with the star nozzle and pipe any knitting pattern on the cake.
- Chill the cake for about 2 hours.
Notes
- Do not bake the sponge cake longer than necessary or it may become brittle and not bend. Use a toothpick to check if it is baked.
- You can adjust the amount of powdered sugar for the decorating cream to taste.
- Detailed instructions on how I decorated my cake are here at the top of the post.
- Note the detailed tips and tricks for making the winter hat cake at the top of the post.